
7 Steps to Creating a Rain Garden (and 5 Major Benefits) – Guest Blog by Rachel Perez
Here at EarthCorps, we love rain gardens. Our crews spend a lot of time implementing and maintaining them across the Puget Sound region. But what exactly is a rain garden, why are they important, and how do you make one?
We’ll let our guest blogger, Rachel Perez, explain:
Rain is an essential step of the natural water cycle. It returns water to the land, thus feeding plants and replenishing waterways. However, what happens if something disrupts that cycle?
Take a look outside. How many non-natural surfaces do you see? Roofs, parking lots, roads—each one is an impervious surface. In other words, water doesn’t absorb through. Instead, these surfaces encourage water to flow to a low point, usually gutters, drains, or outflows into streams.
This may not seem an issue, but most surfaces aren’t clean. As stormwater flows over roads and roofs, it collects pollution and debris. Without absorbing into the ground, that pollution eventually flows into the local waterways. There, it disrupts environments through erosion, animal injury, and algae blooms, to name a few.
Though such issues seem dire, there are steps to take. One such step is a rain garden.
The Major Benefits of a Rain Garden
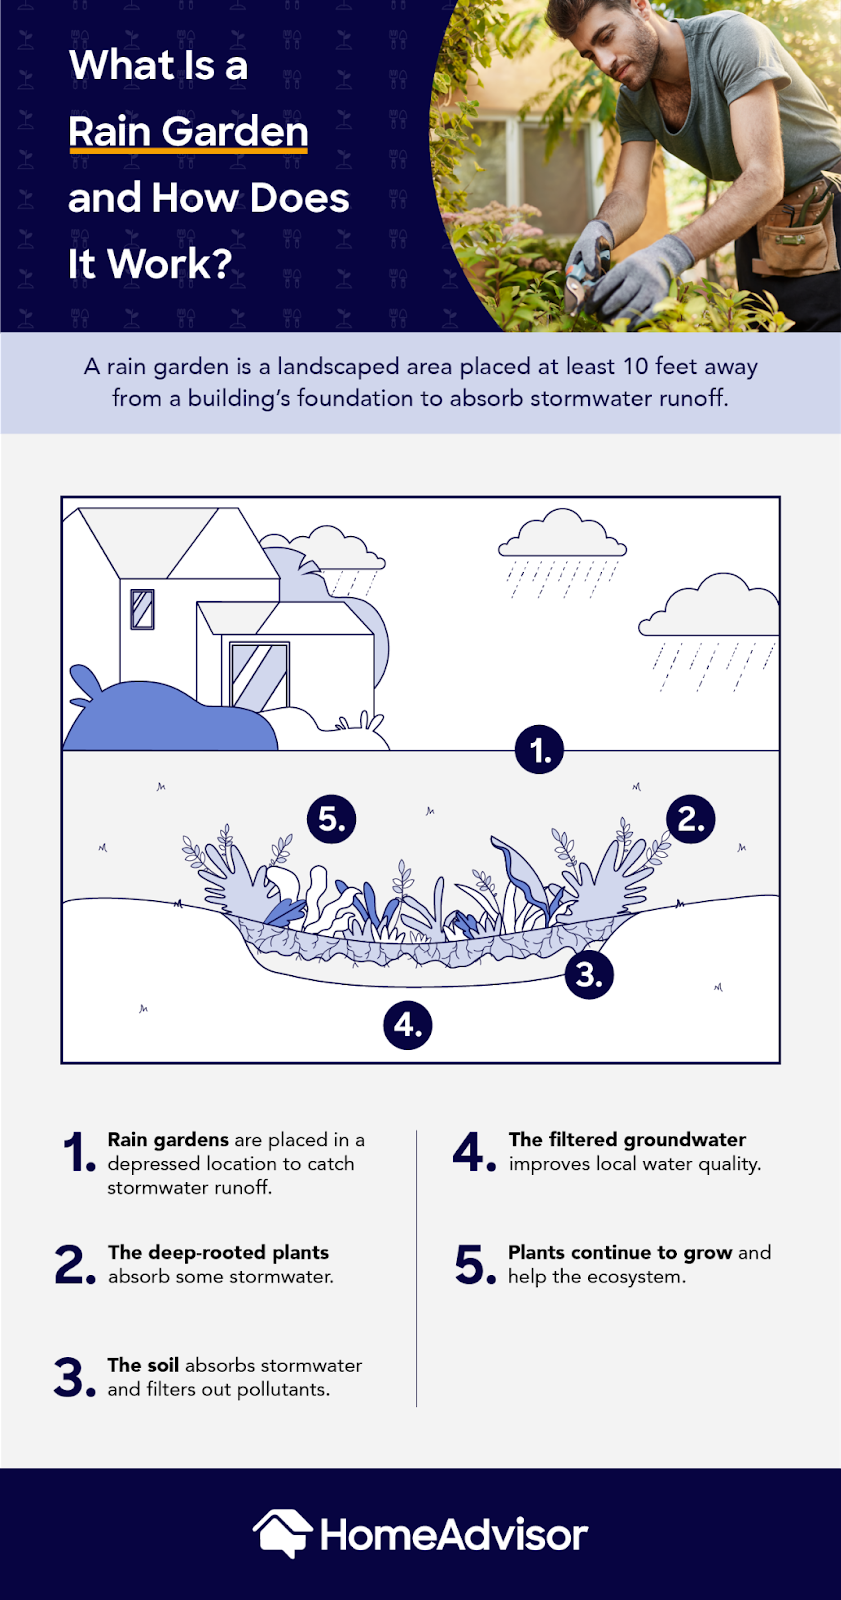
A rain garden is a natural filtration system that disrupts the stormwater flow. It uses native plants with purposeful planting to create an established, living garden. With a bit of planning and hands-on work, a rain garden will:
- Slow and stop flowing stormwater. Rain gardens use berms to create barriers in the path of flowing water.
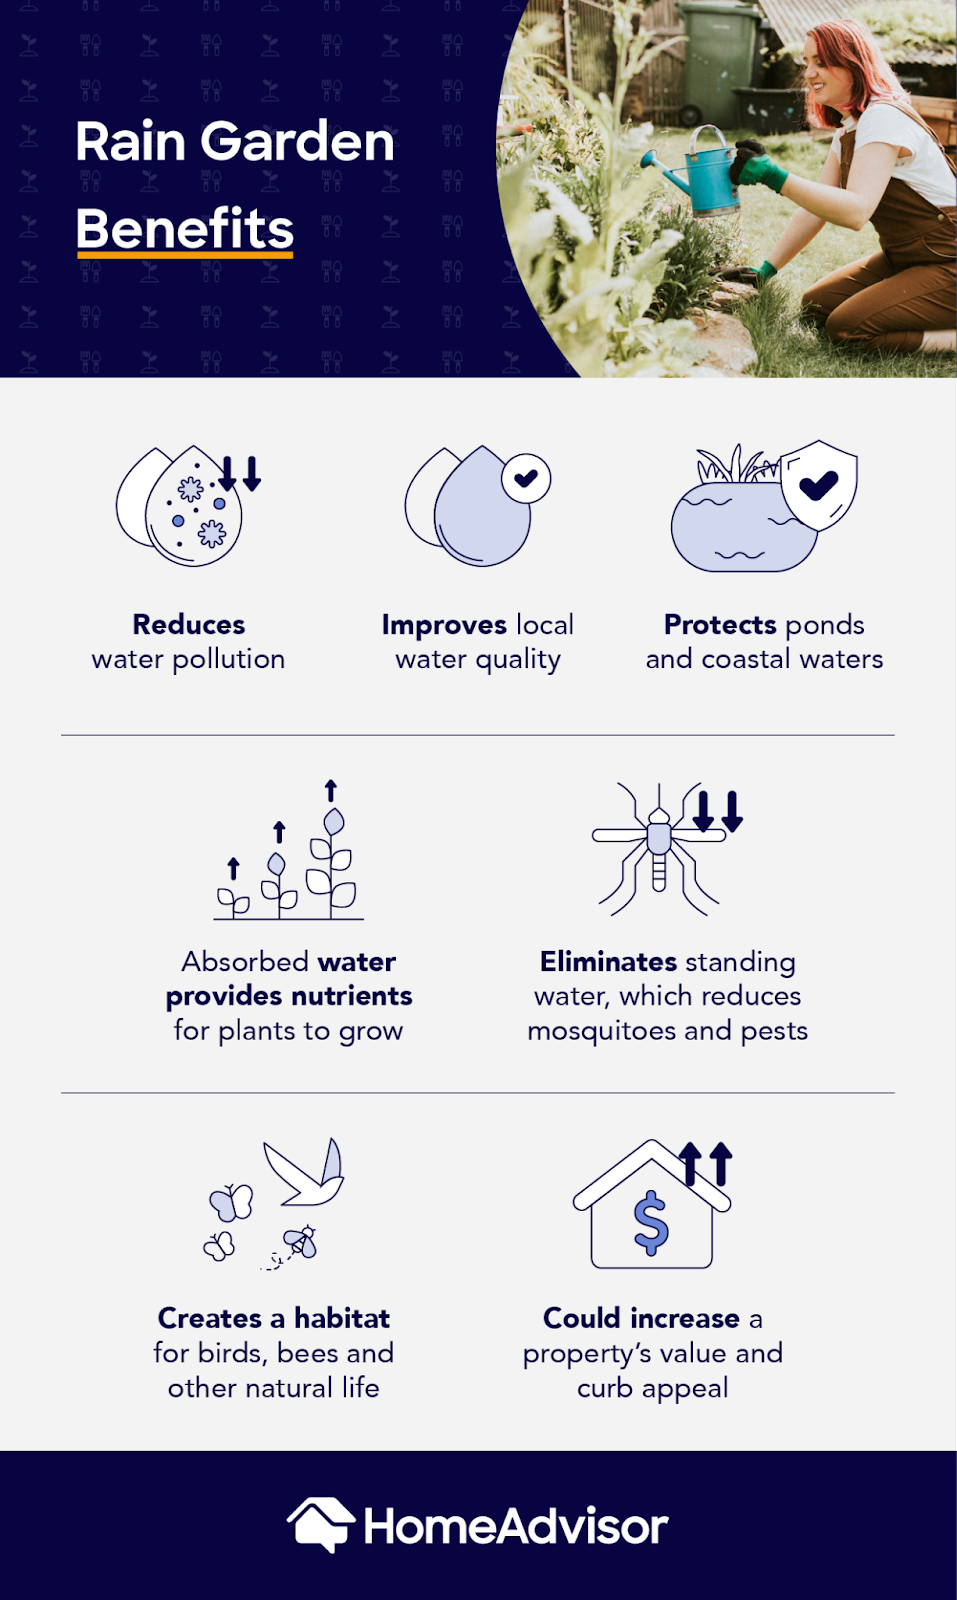
- Absorb and filter stormwater, thus removing toxic particles and excess nutrients from the water. Complex root systems create layers of filtering networks, cleaning the water.
- Control erosion on sloped areas. Roots provide a structure that supports the soil. In erosion-prone locations, a rain garden adds stability to threatened ground.
- Provide an active ecosystem for native animals and insects. From birds to wild bees, rain gardens and their plants create thriving habitats that support nature.
- Create a remarkable visual landmark for your environmentalism. Rain gardens promote discussions of conservation and the vast benefits of protecting nature.
Taking a rain garden from idea to reality is as simple as seven key steps. If you’re ready to start, let’s look at the guide below.
- Plan the Location
Examine your impervious surfaces. The size and location of your roof, driveway, or other non-earth surfaces influences your rain garden options.
If the downspout is the primary contributor to runoff, your rain garden should sit within 30 feet of the downspout. Slopes and low points make excellent rain garden locations. Slopes provide the natural path for runoff to flow. Low points cause runoff to pool and stagnate.
Whatever location you decide, it must not be within 10 feet of the house foundation. A rain garden’s infiltration and absorption properties can disrupt foundations if built too close.
- Identify Your Soil
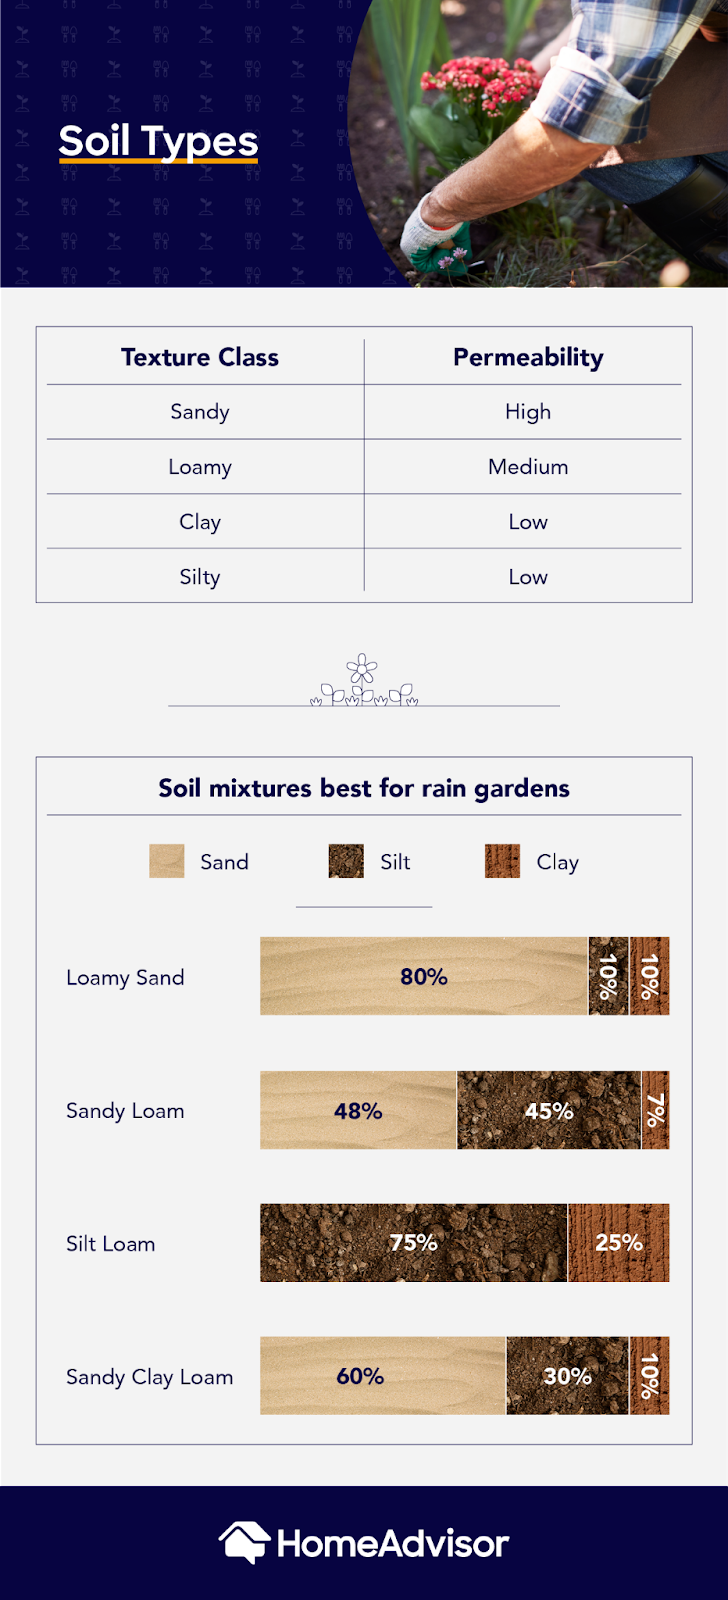
Different soil types have different absorption properties. Sand and sandy soils provide supreme absorption. On the other hand, heavy-clay soils are slow to absorb any water. A quick and easy way to determine your soil type is:
- Grab some dirt from your proposed garden site.
- Add some water and squeeze the earth into a ball.
- Sandy soil crumbles immediately. Loamy soil sticks a bit before crumbling. Clay soils stick and hold their shape.
Don’t worry; rain gardens exist on nearly every soil type. Some just require a little planning. Adding sand to heavy-clay soil increases its permeability. Likewise, using gravel and other substrates will improve absorption in any soil.
- Choose the Ideal Size
The ideal rain garden size depends on the soil type. Clay soils require larger surface areas to match the absorption of sandy soils. With that said, even the smallest rain gardens make a positive impact.
Studies have shown that the ideal garden size ranges from 100 to 300 square feet under common conditions. This differs based on soil and other variables. However, gardens of this size will provide plenty of drainage and water entrapment to keep dangerous toxins out of the water cycle.
Since rain gardens are often built on slopes, you will also need to determine the garden depth. Typically, this is 4 to 8 inches, with the center deeper than the edges to prompt drainage.
Even on a slope, the rain garden must be flat. Greater slopes need more garden depth to catch the water. If the slope of the ground is less than 4%, then dig to 5 inches. A greater pitch requires a deeper garden center of up to 8 inches below ground.
- Gather Your Tools and Supplies
The tools needed to build a rain garden are straightforward. You need shovels, stakes, string, and a level. With these, you can dig the perfect garden to catch and filter stormwater runoff.
The materials require some extra planning. A standard rain garden needs:
- Topsoil
- Mulch
- Soil amendments such as sand or compost
- Crushed stone, gravel, and other substrates
- Native trees, plants, and grasses
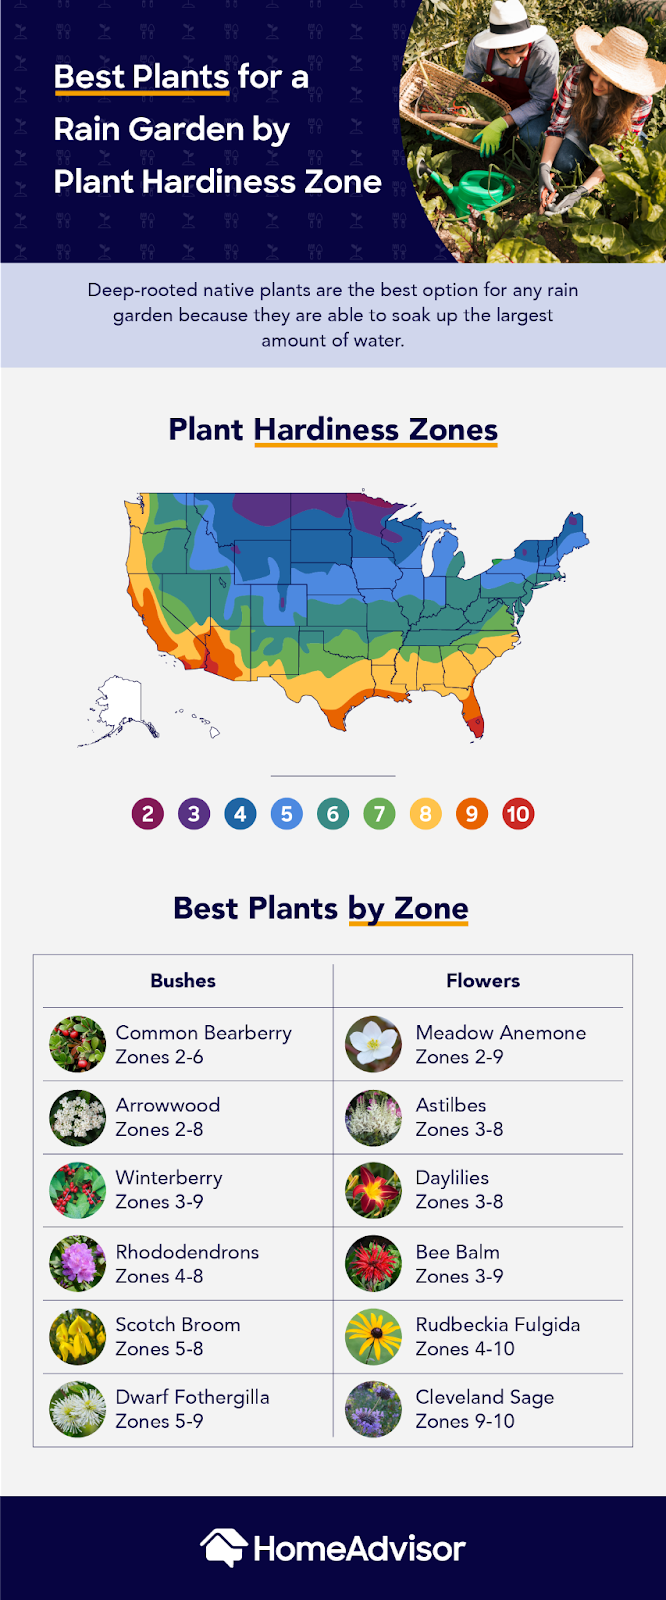
It is essential to plant native flora in your rain garden. Not only are they hardy and resistant to local climate and pests, but they are also often best suited for the conditions within a rain garden.
For example, drought-resistant plants and grasses will thrive even without rain. And wetland plants are ideally suited for living in water-saturated soils.
Also, include plants with robust root systems. These are vital against erosion, and they help absorb water while trapping harmful toxins.
Finally, focus on plants that further add to the environment. Native perennials are often preferred food sources for bees and other insects. Trees provide shade and habitats for birds and other animals. With planning, a rain garden has the potential to become a major boon for your community.
- Break Some Ground
Once it’s time to dig, soak the ground with water, and use stakes and cordage to mark off the dig zone. You should always call 811 or another local utility company to verify that there are no buried cables or other hazards.
Once the area is ready, start digging. Begin in the center, which is the lowest point. Use the dirt to create a berm around the garden. This natural barrier keeps the flowing water within the garden. It also helps slow erosion of the slope. Starting in the center of the garden gives you access to the deepest area of soil.
To build the berm:
- Compact a soil mass 6-8 inches high around the garden edge.
- On heavy slopes, build the berm higher on the downhill side.
- Cover it with gravel or stones to provide further protection over the years.
- Or, plant grass on the berm to keep the natural look.
Building the berm should use all of the soil from digging the garden. The garden itself should slope at the sides, which are shallower than the center. Once the area is dug out, backfill with any needed amendments or substrates. Compost works as a great organic top filler.
After this, the garden is ready for planting.
- Time to Plant!
Once it’s planting time, take a moment and finalize the layout. Planning the garden layout ensures that your plants thrive under the unique conditions of a rain garden. Also, since rain gardens become such brilliant visual additions to a yard, taking some time to plan is a sound decision.
Using the native flora you chose earlier, fill the garden in a way that makes sense. For example:
- Trees and shrubs should line the downhill side for erosion control.
- Wetland grasses thrive in the dry-to-saturated areas of the garden.
- Drought-resistant bushes and broad grasses like sedges are perfect for the garden center.
- Use bright perennials to add color, beauty, and added environmental value.
There isn’t a one-size-fits-all plan for rain gardens. Indeed, many times, nature thrives no matter how you plant the garden. If in doubt, try and mimic the nature around you. Remember, the ultimate guide is literally at your fingertips.
- Maintenance and Beyond
For the first two years, your rain garden needs some maintenance. It should receive an inch of water each week. That means watering it yourself if it doesn’t rain. Don’t worry about fertilizers; the native flora thrives without it.
Use mulch and active weeding to keep out competing plants. Prune dead leaves and branches as they occur, but leave the detritus in the garden to return nutrients to the soil. As the garden grows, it will crowd out invasive plant species.
After two years, a rain garden becomes mostly self-sustaining. Keep an eye out to remove any debris that flows into it. Otherwise, rain gardens become thriving micro-ecosystems on their own.
Using native plants allows the garden to weather the winter months. Colder states should use an extra layer of compost to keep the soil moist. Even if the plants die during the winter, the roots and other absorption means will remain. This allows the rain garden to function during the winter, filtering snowmelt and briny street runoff.
At that point, the garden will become a permanent fixture of nature. Hopefully, it will also inspire many others to build their own.
Final Thoughts
Rain gardens are simple tools to help fight the problems caused by stormwater runoff. Even with a small footprint, a rain garden protects the land from the pollution of humans. Any help is a step in the right direction.
As well, rain gardens make incredible focal points. Aside from potentially boosting the land value, rain gardens spark conversation. Not only does a rain garden filter and collect runoff, but it also teaches your friends, family, and neighbors the impact of stormwater.
If you’re near Puget Sound and thinking of installing a rain garden, the professionals at EarthCorps will provide expert design and installation tips. They are also leaders in rain garden installation, especially concerning environmental well-being.
Take a bit of time and plant a rain garden on your property. The environment will thank you.